How to Insert a Signature in Microsoft Word

Word has many features and capabilities, including inserting signatures. In this guide, you will learn how to insert a signature in Microsoft Word in simple steps.
Your handwritten signature gives your Word document a personal touch. You can scan your signature and store it as a picture to insert in the document.
You can also insert a signature line to indicate where a signature should be written.
- Click where you want the line.
- Click Insert > Signature Line.
- Click Microsoft Office Signature Line.
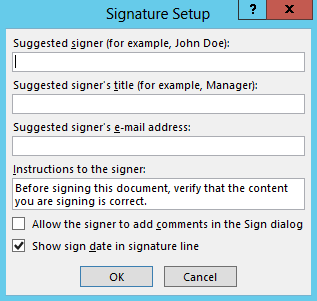
- In the Signature Setup box, you can type a name in the Suggested signerbox. You can also add a title in the Suggested signer's title box.
- Click OK. The signature line appears in your document.
If you’re currently working on a project that requires you to add your signature, you’re in luck. Word will users to add a signature into documents with ease.
Don’t waste time printing out documents and hand-signing them just for the sake of having your signature on the paper. Add your signature within Word itself by following our guide on how to insert a signature into Word below.
How to add a signature line to a Word document
Adding a signature line in Word gives you a designated spot to place your signature, making your document look professional. Here are all the steps to add a signature line in Word.
- Place the cursor where you want to insert your signature line in the document.
- Go to the Insert tab in the Ribbon interface on top of your screen.
- Open the Signature Line menu and select Microsoft Office Signature Line from the drop-down options.

- Enter any of the following information as needed:
- Suggested signer: The signer's name.
- Suggested signer's title: The signer's title, if any.
- Suggested signer's e-mail address: The signer's e-mail address.
- Instructions to the signer: Add instructions for the signer.
- Select one or both of these options, as needed:
- Allow the signer to add comments in the Sign dialog box.
- Show sign date in signature line.
- Click the OK button. You should immediately see a warning that the document needs to be signed.
Add a digital signature to a Word document
Note: To be able to complete this method, you need to first obtain a digital certificate using this Microsoft guide. This is important if you’re looking for authentic, highly secure signatures to use in your Office documents.
The most secure way of adding a signature to your Word documents is using a digital certificate. This is different from most other virtual signatures, as it actually uses verification and encryption.
Here’s how you can insert a digital signature into a Word document.
- In your document, move the cursor where you want to insert your signature.
- Go to the Insert tab in the Ribbon interface on top of your screen.
- Open the Signature Line menu and select Microsoft Office Signature Line from the drop-down options.
- Input all the data required in the Signature Setup window. This includes the signer’s name, title, and email address.
- Follow any further on-screen instructions if prompted, then click the OK button.
- Right-click the signature field and choose Sign from the menu.
- Choose one of the options:
- Add a printed version of your signature
- Insert an image of your signature
- Add a handwritten signature (tablet PC users only)
- Click the Sign button. You should see the Signatures button appearing at the bottom of your document, signaling that the file has been signed by you.
Add an electronic signature to a Word document
As opposed to digital signatures, electronic signatures don’t use certificates. They serve more as a virtual mark, which makes them a popular choice for people working online as it’s accessible and easy to insert.
The following steps describe how you can add an electronic signature into a Word document with ease.
- Get your signature on your computer:
- Write your signature down on a piece of white paper and either scan it or take an image of it. Import this image onto your computer.
- Use a tablet or touchscreen device to “draw” your signature. Save the file on your computer.
Make sure the image of your signature is saved in one of the following file formats: .bmp, .gif, .png, or .jpg. - In your document, move the cursor where you want to insert your signature.
- Go to the Insert tab in the Ribbon, and select Picture (alternatively Picture from File on Mac) to open your file browser.

- Navigate to your image file and select it, then click the Insert button.
- If needed, click on your picture and crop it using the Picture Tools Format tab in the Ribbon. You can save the edited picture for future use by right-clicking on it and choosing Save as Picture.
Add a signature via PDF
Word documents are easy to tamper with, which means people may alter or delete your signature. If you’re looking for a little more security but want the convenience of electronic signatures, convert your Word document into a PDF and sign the document using a third-party tool.
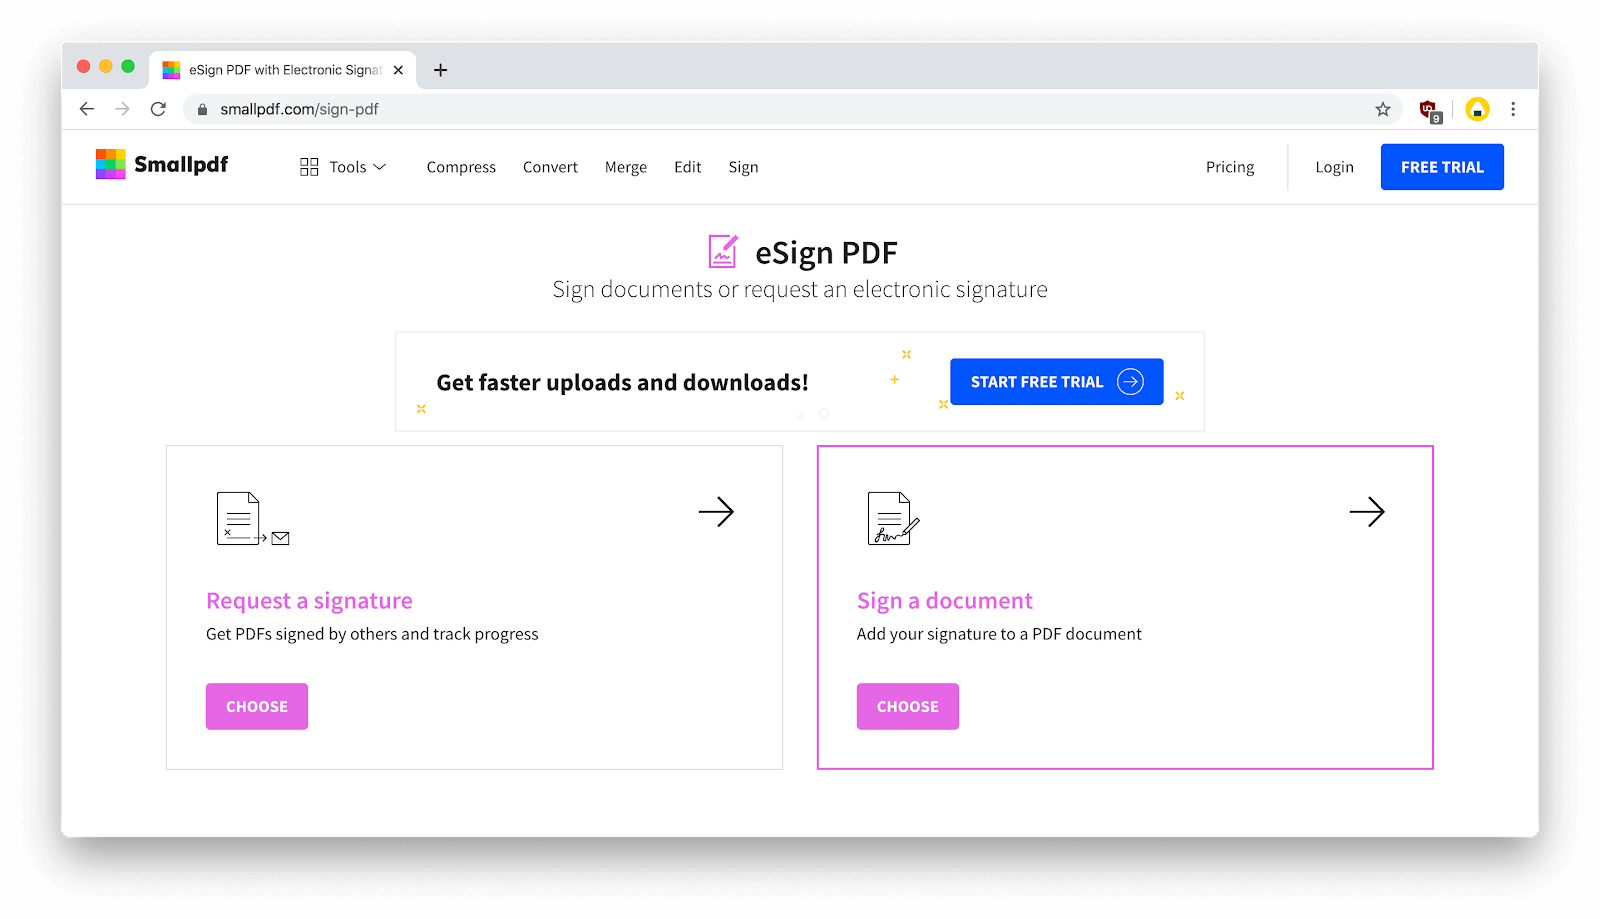
We’ll be using the Smallpdf eSign tool to get this done. Here are all the necessary steps.
- Save your Word file as a PDF by using the Save as… feature, or convert it into one using any online Word to PDF tool.
- Open the eSign website in your browser.
- Click on the Sign a document option and upload your PDF file.

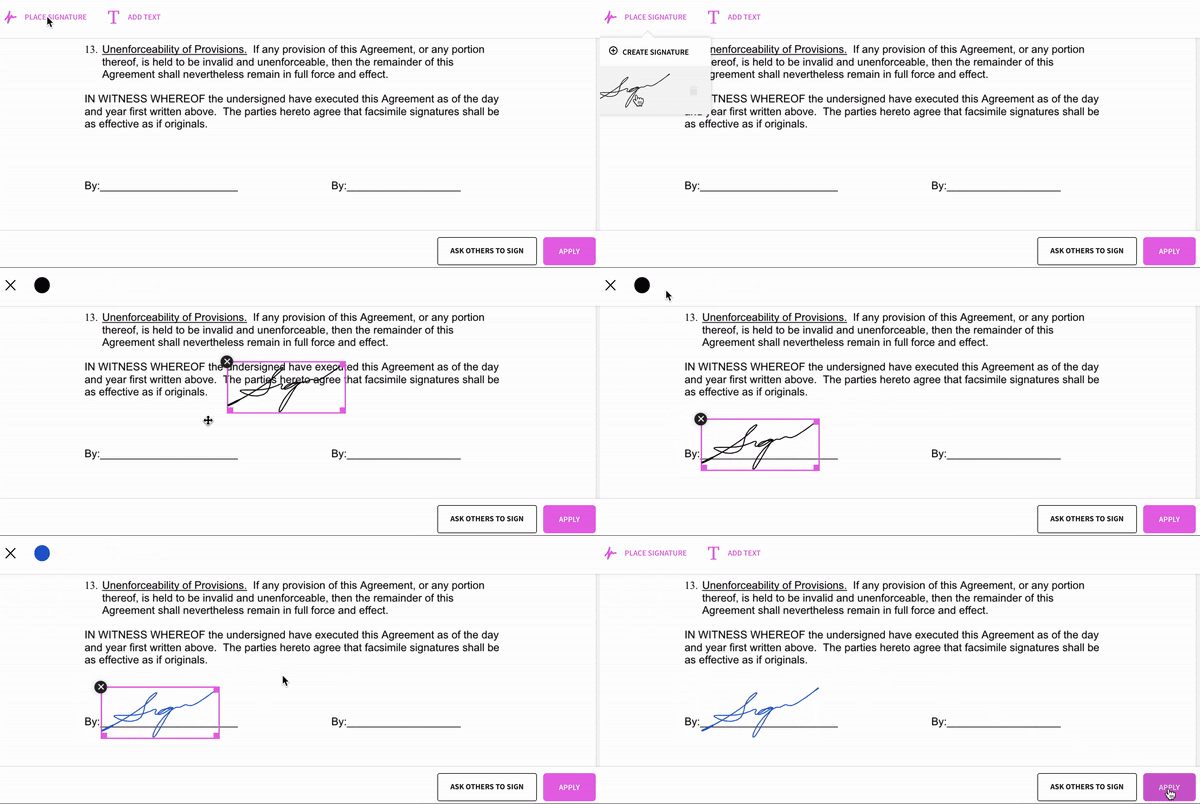
- Click on Place Signature to either create a signature or import an image of your signature. Move the signature into place and resize it using the on-screen controls. You can even choose between black and blue for the signature color.

(Source: Smallpdf) - Download your file. Now, no one can make edits to it while you still have a quick and convenient way of adding your electronic signature.
Conclusion
We hope that this article was able to help you insert a signature into your Microsoft Word document and add an extra professional touch to impress your readers. If you ever forget how to do this in the future, make sure to return to our article!
If you’re looking for more tips and tricks on using Microsoft Word and other Office applications, check out our other posts by navigating to our blog section.
Browse through endless articles, guides, and tips to maximize your efficiency and learn more about these amazing software.
Further Reading
> How to Curve Text in Word
> How to Sort by Date in Excel
> How to Wrap Text in PowerPoint
> How to Insert a Horizontal Line in Word
> Insights into the Windows 10 Start Menu


