How To Use Excel’s DATE Formula Function

Dates can be extremely important to make sure your worksheet data is always up-to-date. Stay on top of deadlines and gain control of your time by taking advantage of the DATE function in Microsoft Excel.
Excel is well equipped with a plethora of formulas to enhance your user experience. While many of them focus on mathematical calculations, some formulas aim to make other parts of your life easier.
One of these functions is the DATE formula, focusing on handling time and dates.
What is the DATE function in Excel?
Description
The DATE function in Excel creates a valid date from the individual year, month, and day components. It’s mainly used for assembling dates that need to change dynamically depending on other values in a worksheet.
Formula/Syntax
=DATE(year,month,day)
Arguments
- Year - Required argument.
- The value can include 1 to 4 digits. Excel will always interpret this argument according to the date system used by your computer.
- By default, Excel for Windows uses the 1900 date system. This means that the first date is January 1, 1900.
- Month - Required argument. Represents the month of the year from 1 to 12 (January to December).
- Can be a positive or negative integer.
- If the argument exceeds 12, Excel will add the number of months to the first month of the year.
- If the argument is less than or equal to 0, Excel subtracts the absolute value of (month+1) from the first month of the year.
- Day - Required argument. Represents the day of a month from 1 to 31.
- Can be a positive or negative integer.
- If the argument is greater than the number of days in the specified month, Excel adds it to the first day of the month.
- If the argument is less than 1, Excel will subtract the value of the number of (days+1) from the first day of the month.
How to use the DATE function in Excel?
The guides below were written using the latest Microsoft Excel 2019 for Windows 10. If you’re using a different version or platform, some steps may vary. Contact our experts if you need any further assistance.
1. Return date and time
If you want to return any date and time value, you can use different functions. Below are some of the examples for using these functions, and what exactly they do.
- Select any output cell for the date. This cell can be completely independent of other cells in your workbook.
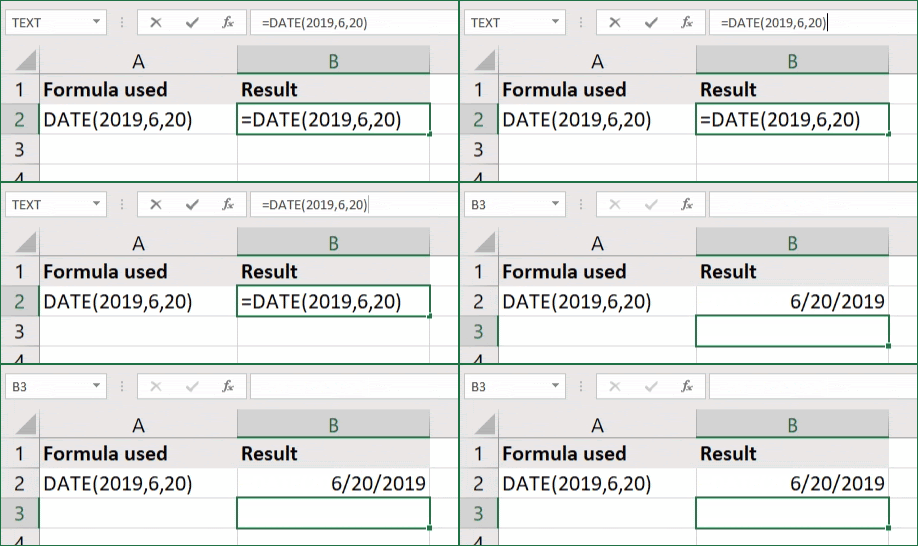
- Use the =DATE(year,month,day) formula to return a specific date. For example, we’ll use =DATE(2019,6,20).

Imgur link - As you can see, the formula returns a properly formatted date field with the specified date. You may reference this cell for any date- and time-related functions.
2. Return today’s date and time
To spare yourself from having to manually input today’s date and time, you can use two formulas instead. These fields will be properly formatted and eligible for any further date and time functions.
- Select any output cell for the date. This cell can be completely independent of other cells in your workbook.
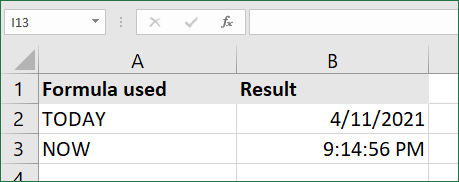
- Use the =TODAY() formula to return today’s exact date, or =NOW() to return the time and date together.

- If necessary, use the drop-down menu in the Number section of your ribbon interface to change a field to a date or time field. This can be found in the Home tab.

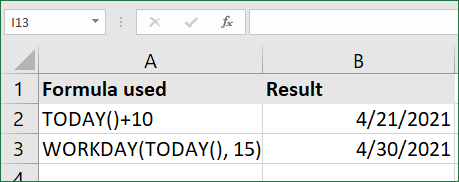
- To perform calculations with today’s date, you can incorporate it into other formulas. For example, use =TODAY()+10 to add 10 days to today’s date, or =WORKDAY(TODAY(), 15) if you want to add 15 workdays.

Warning: The value returned by the TODAY and NOW functions in Excel will automatically update when your worksheet is recalculated to reflect the current date.
3. Return the first day of the current month
If you need to quickly insert the first day of the current month in the current year, Excel has a formula for it.
- Select any output cell for the date. This cell can be completely independent of other cells in your workbook.

- Use the =DATE(YEAR(TODAY()), MONTH(TODAY()), 1) formula to return the first day of the current month in the current year.
- Voila! You're done!
Final thoughts
We hope you were able to learn all about the DATE formula in Excel with the help of this article. Now, you’ll be able to incorporate a variety of dynamic date elements into your worksheets.
Before you go
If you need any further help with Excel, don’t hesitate to reach out to our customer service team, available 24/7 to assist you. Return to us for more informative articles all related to productivity and modern-day technology!
Would you like to receive promotions, deals, and discounts to get our products for the best price? Don’t forget to subscribe to our newsletter by entering your email address below! Receive the latest technology news in your inbox and be the first to read our tips to become more productive.
You may also like
» How to use NPER Function in Excel
» How to Add Standard Deviation Bars in Excel
» 14 Excel Tricks That Will Impress Your Boss


