How to Fix the Battery Icon Missing or Grayed Out in Windows 10
Laptop users have the advantage of taking their computer anywhere. However, this doesn’t last forever, depending on the battery of your device. Most people can tell the state of their battery from a quick glance, however, some Windows 10 laptop users noticed that the battery icon is missing.
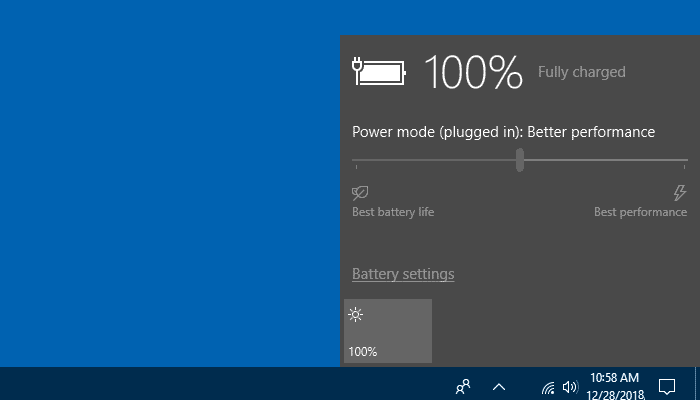
The battery icon should appear in Windows 10’s system tray, also called the notification area, next to the time and date. If you can’t see it or it’s greyed out, it may have been hidden, disabled, or corrupted.
In this article, we’ve listed some useful methods you can use to try and restore it.
Jump to Solution:
- #1. Select the battery icon to appear on the taskbar
- #2. Disable and re-enable battery hardware
- #3. Update Windows 10
- How to fix the battery icon greyed out
- #1. Scan for hardware changes
- 2. Run the System File Checker
- Final Word
How to fix the battery icon missing
#1. Select the battery icon to appear on the taskbar
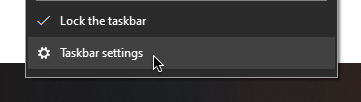
It’s possible that the battery icon was simply disabled or never turned on in the first place. You can fix this issue by toggling the Power option to show up in your system tray.
- Right-click on an empty space in your taskbar, then select Taskbar settings. This is going to open up the appropriate Settings app page.
- Scroll down until you see the Notification area section. Here, click on the “Turn system icons on or off” link.

- Locate the Power toggle, and make sure that it’s turned to the “On” setting. This will ensure that the battery icon is visible in your system tray.

- If you still don’t see the battery icon, go back to the Taskbar settings and click on the “Select which icons appear on the taskbar” link from the Notification area section.

- Scroll down until you see Power, then toggle the switch to its “On” setting. You should be able to see the battery icon in your taskbar now.

#2. Disable and re-enable battery hardware
Sometimes all you need to do in order to fix something is restart its device. The same goes for your laptop batteries.
If the battery icon seems to be missing, try restarting the device. This signals your computer that the batteries are indeed there, making the icon re-appear.
Note: Make sure to connect to an external power source before attempting this method!
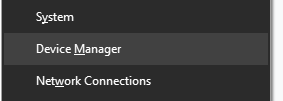
- Press the Windows + X keys on your keyboard, then choose Device Manager from the Quick Access Menu.
- When the Device Manager loads up, locate the Batteries category, and expand it by clicking on the arrow icon. You should be able to see two items:
- Microsoft AC Adapter
- Microsoft ACPI-Compliant Control Method Battery.
- Right-click on Microsoft AC Adapter, then select the Disable device option.
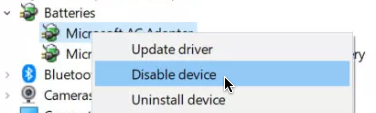
- You should see a warning notification prompting you to confirm that you want to disable the device. Click on “Yes.”
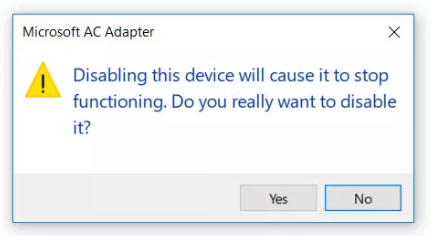
- Repeat Step 3. and Step 4. with the Microsoft ACPI-Compliant Control Method Battery device.
- Next, re-enable both devices by right-clicking on them and choosing the Enable device option.
- Restart your computer. You should be able to see the battery icon re-appear in your taskbar after the next boot.
#3. Update Windows 10
Some users report that simply switching to the newest version of Windows 10 made the battery icon re-appear.
- Open the Settings application using the Start menu or the Windows + I keyboard shortcut.
- Click on Update & Security.

- In the Windows Update tab, click on the Check for updates button.

- If a new update is found, click on the Install button.
- After your system successfully installs the newest Windows 10 update, you might be able to see the battery icon showing up and functioning again.
How to fix the battery icon greyed out
#1. Scan for hardware changes
Simply making your laptop recognize hardware changes can re-enable the battery icon in your system tray.
- Press the Windows + X keys on your keyboard, then choose Device Manager from the Quick Access Menu.
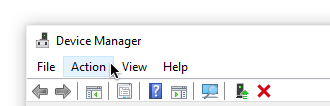
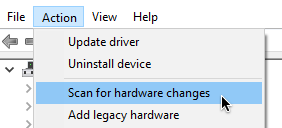
- When the Device Manager loads, click on the Action menu from the ribbon.
- Choose Scan for hardware changes.
- Expand the Batteries category and make sure you see both of the following two devices listed:
- Microsoft AC Adapter
- Microsoft ACPI-Compliant Control Method Battery.
- Restart your computer. When it boots up, check if the battery icon shows up without being greyed out.
2. Run the System File Checker
The System File Checker is a tool available in Windows 10 by default. It’s also called an “SFC scan,” and it’s your quickest way to automatically fix corrupted system files and other issues.
Here’s how to run it.
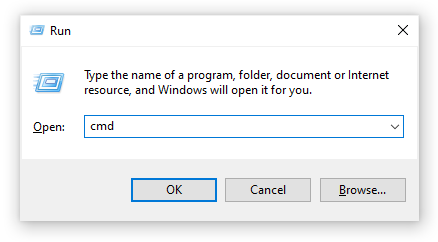
- Press the Windows + R keys on your keyboard to launch the Run utility. Type in “cmd” and press Ctrl + Shift + Enter. This is going to open the Command Prompt with administrative permissions.
- If prompted, make sure to allow the Command Prompt to make changes on your device. This means that you might need an administrator account.
- Type in the following command and press Enter: sfc /scannow
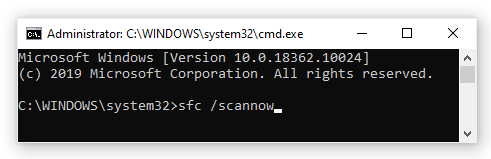
- Wait for the System File Checker to finish scanning your computer. If it finds any errors, you’ll be able to fix them automatically through the SFC command itself, which may also fix related errors.
Final Word
We hope these methods were able to assist you in restoring the battery icon. Now, you can always know when to start thinking of saving those precious battery percentages.
Are you interested in learning more about Windows 10? Check our guide on how to fix your computer is running low on memory here. You can browse our dedicated Help Center section for related articles.
If you’re looking for a software company you can trust for its integrity and honest business practices, look no further than SoftwareKeep. We are a Microsoft Certified Partner and a BBB Accredited Business that cares about bringing our customers a reliable, satisfying experience on the software products they need. We will be with you before, during, and after all the sales.